Sun Room Part Two
Now that we've gotten the framing and rebuilding out of the way, it's time for the interior. Seeing the outside with all of the windows in and siding up definitely made it a LOT more real. It looked like an actual room. But getting the interior done will make it an actual room with walls and flooring and the ceiling and decor!! Lots of decor! But not just yet.
Since we finished up the exterior as quickly as we did, my Daddy-O offered to help with the interior as well. Bless his heart. Here's what we did before he and my aunt left to go back to MA.
First- electrical. He asked if I wanted outlets and I said yes. He asked how many and I said LOTS. Like, probably way more than I'll ever need. But you never know when you'll need a spare outlet.
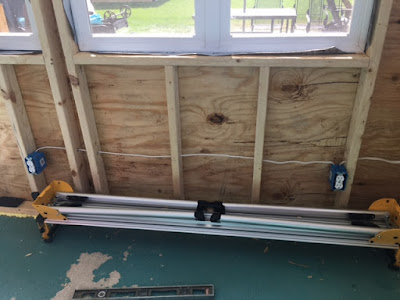

Here's just two walls. Oh and see the gray one in the corner in the photo above? That's the outdoor box. Seriously though- there are now six electrical outlets in the sunroom now. SIX! I've got the power.
Then came the ceiling. Oh. The ceiling. The bane of my existence. I went to a burger joint one night and I happened to look up at the ceiling and saw the most beautiful stained wood ceiling and I knew I had to have it. It was what I referred to as a "mink" color. It had tones of brown and gray swirling throughout. It was a blended combination that went so perfectly. And like I said- I HAD TO HAVE IT. My waiter came over and asked if I needed anything else. I said, "Yes, actually. Could you find out the color stain that was used on the ceiling?" I mean, a completely normal question for a waiter. Right? Well he looked at me like I had 4 heads, gave me some bullshit brushoff and never came back. I made it my mission to find said color stain. And didn't tip him.
I came up with nothing. NADA. None of the stains around here are a mixture of gray and brown. So I got it in my head that I'd create the color myself. Cuz apparently I'm a color specialist. I bought so many different cans of gray stain, mixed it with brown stain, it did nothing. I stained the wood brown first, then went over with a coats of gray. It sort of worked. But not quite what I wanted. We brought the piece in that I "thought" looked like what I wanted and held it up and you couldn't even SEE the gray on it. I finally gave up because I had about 20 boards that needed to get stained and put up onto my ceiling and I wasn't about to be trying to get this color to work on every damn piece of it. So I gave up. I went with my go to stain- dark walnut. I ran out of the quart I had so I went to get another and they were OUT. Cuz that's my luck. So I ended up getting a gallon of it and then had to go to work. My dad and aunt then went to town on the remaining unstained boards. They got the first coat on all of the boards and stopped. The gallon color was definitely NOT the same as the quart I had. Like, drastically different. They didn't want to go further until I saw it.
When I got home the boards were in the garage, under the garage lights. I didn't like them. I was almost at the point of hating the color on the boards and possibly crying because I wanted the ceiling to look amazing. And I didn't think it would. I finally asked if we could pull all of the boards out in the driveway and see what they looked like. Hence the below photo.

This photo was after we moved them around and sorted them so the two different tones weren't so obvious. And once it was out into the daylight, I loved them! Amazing what different lighting can do.
Then came time to get them onto the ceiling. Check out the Pops. He got to use his fancy schmancy new nail gun for this job.


The middle photo it's very obvious which boards I did with the original stain and which ones were done with the gallon color. They almost look black. Fast forward to it being done- hah as IF it was that easy.


The color is kind of washed out since it was so dang bright in there when I took these. But once you see the below photos with my super cool airplane propeller-like ceiling fan, you'll get a much better idea of what it looks like.


Beautiful right? I seriously go out there and just start at it. Like, a lot. So puuuuuuuurty.
Then came putting up the first layer of "walls". We got sheets of luan plywood- which is basically super thin plywood and my Dad got that taken care of the last day they were here.


It definitely looks different with actual "walls" up, doesn't it? It's definitely coming along! Such a difference from what it was a week before that!
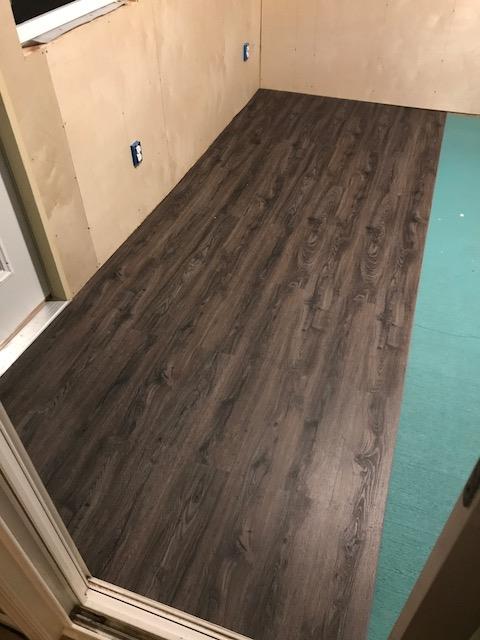
Here's the last update on the inside for a while. I had Monday and Tuesday off of this week. So on Monday, I got to work on the floor. I got about half of it done before I called it a night.


Yesterday, I finished it.


Up next?
Since we finished up the exterior as quickly as we did, my Daddy-O offered to help with the interior as well. Bless his heart. Here's what we did before he and my aunt left to go back to MA.
First- electrical. He asked if I wanted outlets and I said yes. He asked how many and I said LOTS. Like, probably way more than I'll ever need. But you never know when you'll need a spare outlet.


Here's just two walls. Oh and see the gray one in the corner in the photo above? That's the outdoor box. Seriously though- there are now six electrical outlets in the sunroom now. SIX! I've got the power.
Then came the ceiling. Oh. The ceiling. The bane of my existence. I went to a burger joint one night and I happened to look up at the ceiling and saw the most beautiful stained wood ceiling and I knew I had to have it. It was what I referred to as a "mink" color. It had tones of brown and gray swirling throughout. It was a blended combination that went so perfectly. And like I said- I HAD TO HAVE IT. My waiter came over and asked if I needed anything else. I said, "Yes, actually. Could you find out the color stain that was used on the ceiling?" I mean, a completely normal question for a waiter. Right? Well he looked at me like I had 4 heads, gave me some bullshit brushoff and never came back. I made it my mission to find said color stain. And didn't tip him.
I came up with nothing. NADA. None of the stains around here are a mixture of gray and brown. So I got it in my head that I'd create the color myself. Cuz apparently I'm a color specialist. I bought so many different cans of gray stain, mixed it with brown stain, it did nothing. I stained the wood brown first, then went over with a coats of gray. It sort of worked. But not quite what I wanted. We brought the piece in that I "thought" looked like what I wanted and held it up and you couldn't even SEE the gray on it. I finally gave up because I had about 20 boards that needed to get stained and put up onto my ceiling and I wasn't about to be trying to get this color to work on every damn piece of it. So I gave up. I went with my go to stain- dark walnut. I ran out of the quart I had so I went to get another and they were OUT. Cuz that's my luck. So I ended up getting a gallon of it and then had to go to work. My dad and aunt then went to town on the remaining unstained boards. They got the first coat on all of the boards and stopped. The gallon color was definitely NOT the same as the quart I had. Like, drastically different. They didn't want to go further until I saw it.
When I got home the boards were in the garage, under the garage lights. I didn't like them. I was almost at the point of hating the color on the boards and possibly crying because I wanted the ceiling to look amazing. And I didn't think it would. I finally asked if we could pull all of the boards out in the driveway and see what they looked like. Hence the below photo.

This photo was after we moved them around and sorted them so the two different tones weren't so obvious. And once it was out into the daylight, I loved them! Amazing what different lighting can do.
Then came time to get them onto the ceiling. Check out the Pops. He got to use his fancy schmancy new nail gun for this job.

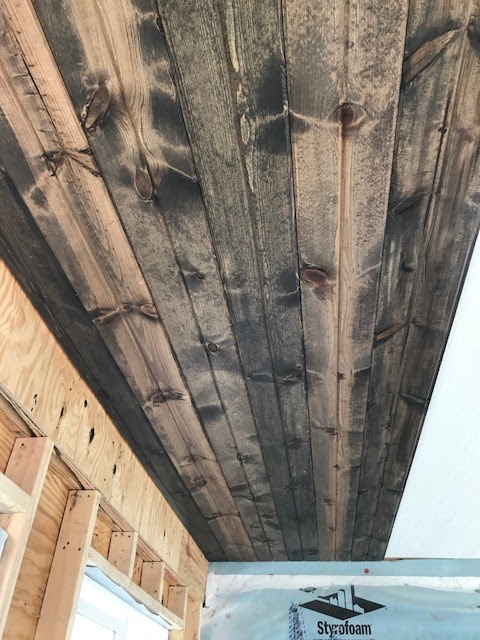

The middle photo it's very obvious which boards I did with the original stain and which ones were done with the gallon color. They almost look black. Fast forward to it being done- hah as IF it was that easy.


The color is kind of washed out since it was so dang bright in there when I took these. But once you see the below photos with my super cool airplane propeller-like ceiling fan, you'll get a much better idea of what it looks like.


Beautiful right? I seriously go out there and just start at it. Like, a lot. So puuuuuuuurty.
Then came putting up the first layer of "walls". We got sheets of luan plywood- which is basically super thin plywood and my Dad got that taken care of the last day they were here.


It definitely looks different with actual "walls" up, doesn't it? It's definitely coming along! Such a difference from what it was a week before that!
Here's the last update on the inside for a while. I had Monday and Tuesday off of this week. So on Monday, I got to work on the floor. I got about half of it done before I called it a night.

Yesterday, I finished it.


Up next?
- walls
- baseboard
- framing out the interior of the windows
- trimming out the windows
- decor! decor! decor! (I'm not gonna lie- I've bought a LOT of pretty things so far!)


That's a lovely sunroom. The fact that you've been building it yourself is quite impressive. You might want to consider installing single-pane windows to let more sunlight into the room. By the way, is that detached from your house? Would be more effective if it is. Looking forward to see photos of the finished project.
ReplyDeleteFranklin Stewart @ Muller Exteriors
Thank you Franklin! The room is actually attached to the house in one side. So far its working well for us! Can’t wait for warmer weather to get back out there and finish it.
Delete