Sunroom Part Four and Hopefully the Last
Y'all. It only took 9 months but I'm pretty sure the sunroom is finished! I mean, except for the decorating part- which I'm super excited to be able to start putting all the cute stuff I've bought in there! Like a fireplace! But that's for another day. I know, I'm such a tease.
So last we talked about the sunroom, the walls were up and I was going to start on casing and trimming the windows. This is what it looked like.

See the inside of the windows? Still the exposed 2 X 4's. See the top of the walls? You can see how uneven the ceiling is. See the bottom of the walls? You can see how uneven the floor is. Well, they are still uneven but at least I made them look slightly less uneven. But first, windows.
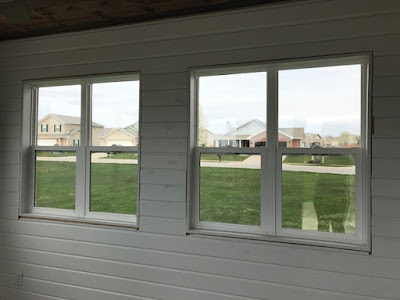

They were really starting to look good once I got the insides all trimmed out. Then came casing them.


Don't they look like real windows now? Like a professional did them. HAH.
So the windows got done about a month ago. Then I was in Florida for two weekends and the following weekend I worked and it rained. So a whole month has gone by without me being able to do anything in there. Until this past weekend!
I started with the ceiling molding- which I chose a simple, flat board since I thought crown molding was a little too fancy for this room. This was thought to be the easiest of what was left to do- so I started there.
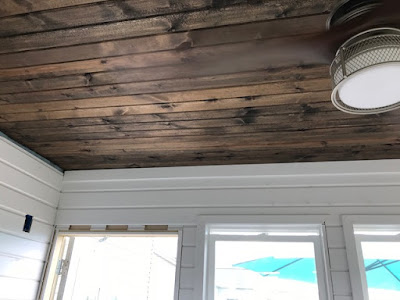
The left wall doesn't have the molding yet and the front wall does. See how much better it looks already?


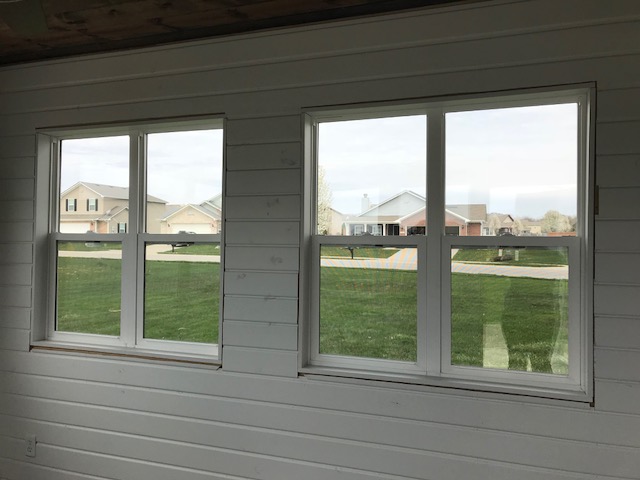
And below are two finished shots!


Then I trimmed out the exterior door using the same boards as the slider.
Finally came time for the baseboards. People- this floor was atrocious. I have no idea who poured this concrete but they should be fired. So rather than putting a baseboard across and having a big gap in the middle, I used a pencil compass/scriber to get the exact sloping of the floor so that the baseboard fit snug against it, leaving no gap. I did an OK job at it. Definitely don't have the most steady of hands. But it'll work. Oh and you can see I also added quarter round in the corners to hide where the boards came together in the corners.


The above picture shows how bad the floor really was. Look at the width of the baseboard under the outlet and then look at how much smaller it is towards the corner. Terrible.


So last we talked about the sunroom, the walls were up and I was going to start on casing and trimming the windows. This is what it looked like.

See the inside of the windows? Still the exposed 2 X 4's. See the top of the walls? You can see how uneven the ceiling is. See the bottom of the walls? You can see how uneven the floor is. Well, they are still uneven but at least I made them look slightly less uneven. But first, windows.

They were really starting to look good once I got the insides all trimmed out. Then came casing them.


Don't they look like real windows now? Like a professional did them. HAH.
So the windows got done about a month ago. Then I was in Florida for two weekends and the following weekend I worked and it rained. So a whole month has gone by without me being able to do anything in there. Until this past weekend!
I started with the ceiling molding- which I chose a simple, flat board since I thought crown molding was a little too fancy for this room. This was thought to be the easiest of what was left to do- so I started there.

The left wall doesn't have the molding yet and the front wall does. See how much better it looks already?


And below are two finished shots!


Then came time for door casings. I have the exterior door and a sliding door in this room. First- the sliding door. Didn't get the bottom trimmed out yet for this pic but that came with putting the baseboards on. First things first, people!

Finally came time for the baseboards. People- this floor was atrocious. I have no idea who poured this concrete but they should be fired. So rather than putting a baseboard across and having a big gap in the middle, I used a pencil compass/scriber to get the exact sloping of the floor so that the baseboard fit snug against it, leaving no gap. I did an OK job at it. Definitely don't have the most steady of hands. But it'll work. Oh and you can see I also added quarter round in the corners to hide where the boards came together in the corners.


The above picture shows how bad the floor really was. Look at the width of the baseboard under the outlet and then look at how much smaller it is towards the corner. Terrible.


Oh and for those of you who took the FB poll a LOOOOOOONG time ago about what rug I should use in the space.... here's your answer.

I can't even begin to tell you just how happy I am that this project is done and over with. It looks so much better and is so much more functional with it as a sunroom rather than a screened porch. I LOVE IT! I can't wait to decorate it and make it pretty!
And if you look really closely at the picture above, you can see the start of our next project...... Get ready for it. I'm super excited over this one too.
So what do you think about the finished sunroom?


Comments
Post a Comment
Only comment if you are going to tell me how awesome I am. If you don't, I will hunt you down and cut a bitch.