If you've been a frequent reader of GWTPTB for any amount of time, you know my obsession with Ikea curtains. You also know my obsession of taking a curtain and using it in a not-so-curtain-y way. So this post is a twofer. You're welcome.
First we'll start with the hunter green curtains I purchased last year for the living and dining room. One thing about Ikea curtains is they come in this super weird length. Most curtains are 84". I believe Ikea picks 98" for theirs. Which is totally fine with me- extra fabric at the end of a project to use on something else! One of the major life changes I was planning on making last year was moving. Out of my house, out of the state of Indiana. With that being said, I decided when I purchased these curtains to not hem them because I didn't know my future houses window height. So why hem them to fit this house and then not be able to use them potentially in my new future house? Well all know how that plan panned out. Whomp whomp. For the last year they've sat billowing at the bottom, all that excess fabric annoying the shit out of me.
Here's a good idea how how much extra length I didn't need to keep tucking under and trying to hide.
After the 937 basketball games we had were over in April, I found time to bite the bullet and sew them to the correct length. First, I took two pins and did a rough estimate of where I wanted them to lay on the floor.
I like my curtains to skim the floor, slightly just long enough to maybe drag the along the top of the floor. Then I took the curtains off the rod and laid them flat on the floor.
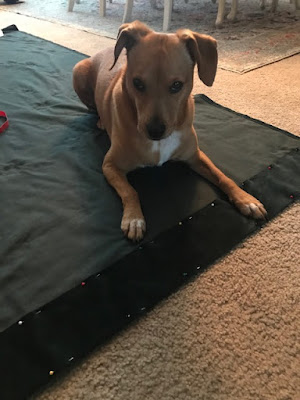
And for those non-believers that my dog is a complete asshole, see paws ALL OVER THE CURTAINS I just laid flat on the floor. If that doesn't convince you, just you hold for more photographic evidence. Asshole.
Next I measured the length from top to bottom of where this temporary hem was and then rounded it to the next inch. So if this was 58 1/4" I went with 59". I measured it on both sides and re-pinned at that new length.
Then I cut off everything more than 5"- the extra fabric was at 10" so I cut off 5".
Then I tucked 1" underneath so my new hem length was 4".
If I don't see you, that means I'm not there.
Pretending to not hear me.
Still pretending to not hear me.
But if I give you my sad puppy eyes, you'll stop yelling at me?
Now I'll just act like I'm asleep and can't hear you. A.S.S.H.O.L.E.
I mean, she's SUUUUUUUUUUUUUPER freakin adorable right?
Once the inch was tucked under and I had the 4" hem, I pinned all across the bottom and sewed them up.
Finished curtains back on the rod.
And living room side. Two pair of curtains, two windows.
And because I have no shame. Here are the front spare bedroom curtains that I've had for.......maybe...... 11 years......... that I also never got to hemming. I mean SPARE ROOM people. But since I had the sewing bug and all of the stuff was out, I figured I might as well get those done too.
Much better. Buuuuuuut, if you thought I brought you to the blog today to see my wonderful curtain hemming skills, you are so wrong. The real reason was I bought another pair of the dark charcoal Sanela velvet curtains. They are glorious. I have them in my bedroom as real curtains, I re-did the back spare room bed in this curtain- full headboard and 3 bed rails all yummy gray velvet, and now I wanted to update something else with it.
So again, back about 11 years ago, my uncle bought me a bedroom set as a housewarming gift. I spent a year looking for the perfect set and couldn't find one. He and my dad flew out from MA after that year of me looking and literally went to every furniture store within the state of Indiana trying to get me to purchase something. Which I didn't cuz that perfect set was just not out there. Once they left, about 3-4 months later, I found it. It was perfect. Well, almost perfect. Like 98.37% perfect.
Here are the bed and nightstands from when I got the set- May of 2011. So actually it was 8 months after they left. Neither here nor there. Don't mind the lack of decor, I hadn't slept in my master bedroom for an entire year and a half of owing my first home. This was straight from the delivery truck, into the room, and throw a duvet and pillows on it for pictures.
So can you guess the one thing I didn't like about this set? The thing that made it "almost" perfect and not "absolutely" perfect? If you guessed that yellow-tan-brownish tweed headboard fabric- DING DING DING we have a winner. Oh my god- it's actually an awful fabric. From far away it's not so bad- just the color isn't visually pleasing. But up close? Yuck.
Fast forward to a few days ago where I decided around 5:30pm that I absolutely HAD to change the fabric right then! Then queue me dragging off a king sized mattress, two box springs, shimmying the bed away from the wall 2" at a time from each side (cuz this bed is heavy as a mofo), and getting enough room in between the bed and wall for me to fit. Then came unscrewing the 45 screws holding it in place. But fairly simple, right?
Then I popped it out and man, that effer weighed about 100 lbs. No joke. I couldn't lift it myself, I had to drag it into the loft to lay down. But I was left with this. So empty inside. Just like me!
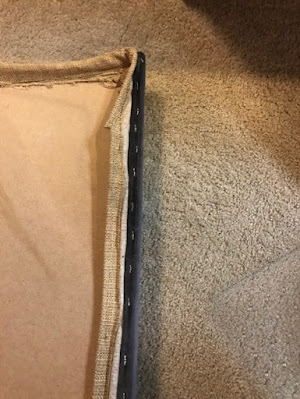
One thing to note- had this headboard not had a beautiful detail of piping around it, this would have taken me about 1 hour since I have re-done about 15 beds in my time. But because of that beautiful detail- that I absolutely wanted to keep- I had to remove no less than 539 staples holding the piping and the fabric onto the headboard. Let me tell you- thank god the piping detail was so beautiful, because my hands hurt for days trying to get each and every staple out. Here's a close up of that godawful tweed.
Here is the piping pulled back with the new fabric on the front of the headboard.
And here is the final headboard- still apart from the bed itself- with the new fabric and piping all done.
At this point it was probably 10:30pm. I did break for dinner and Janie potty breaks. But it definitely took me a solid 4-5 hours start to finish. But so worth it. Here she is back attached to the bedframe.
I mean come on. Scroll back up to the original. Then look at this beauty. What a transformation.
Then with the bed completely made.
Honestly, I would do it all over again even if there were 5 million staples I had to remove. I love it. I'm pissed it took me so long to bite the bullet and actually switch the fabric. Part of me was like "But what if I ruin the bed?" and having to explain that to my uncle. This bedroom set was expensive. Like 7 mortgage payments expensive. I would have been devastated if I damaged it because I wanted new fabric. So I think that's why I hesitated for so long. I always knew- way back 11 years ago I was going to use these Ikea curtains for this headboard so it wasn't about finding the right fabric. I'm just so happy it worked out and I got exactly what I wanted.
But seriously- have you priced out velvet upholstery fabric lately? It's like $49.99 a yard. A YARD. Two yards and I would have paid more than the curtain set. Plus I have an entire second curtain I still have to use. Which is happening literally as I type this up. Fingers crossed by this weekend, I have some pretty new things for you to see!


Comments
Post a Comment
Only comment if you are going to tell me how awesome I am. If you don't, I will hunt you down and cut a bitch.