Happy Sunday!!! While I've been blowing you up with the Florida condo bathroom renos, I've secretly been home working on my own house. Again- the condo bathrooms were a hired out job, I am NOT the one doing those. I'm just showing you pictures of the condo as it's happening. That is all my Aunt. But I was down there visiting her for a few weeks while this was happening so I though you'd all like to see it.
But back to mi casa. Once I finished the upstairs slat wall, I knew what project I would be starting on next. I was just waiting for the main items to go on-sale. Which they didn't. So I went to FL for like, the entire month of Feb it seems. When I came back and the items STILL weren't on-sale, I just bit the bullet and purchased.
You may have seen my sketch that I wanted to do the laundry room as my next project if you follow me on FB.
Back story of the this room is that when I enter my house, I pull into my garage and come in through the laundry room. I've always wanted it to be pretty since this is MY entrance. I don't want to see some ugly ass laundry room right when I get home from a shit day. So what started out originally as this- roughly 12 years ago.
Yes, one wire shelf at the very top of the wall for storage. That shelf- ugh. First- wire. Second, I had to be on my tippy toes, leaning over the washer/dryer to get anything on that shelf. It was SUPER annoying. So I decided to put some wood shelves there instead. I vividly remember standing hunched over on top of the washer/dryer literally RIPPING this shelf out of the wall. It was so gratifying. The room ended up looking like this.
Seriously, look at this shit show. Just keeping it real here. This is what the room looks like 99.999% of the time. A fucking hot mess. I thought cute baskets would contain the crap. Nope. The dryer ends up being a catch-all for things that need to go into the garage but that I'm too lazy to open the door and put into the garage, all of 2 feet away. Red tissue paper? I took this photo in February. That wasn't Valentine's tissue paper. Oy. I needed this, alllllll of this, to just go away. Hence- the cabinets from the drawing.
Let me start with the beginning of the frustrations here. I mentioned I was waiting for the cabinets to go on-sale. These are the SAME cabinets I used upstairs in the living room as the base of the tv/bookcase wall. They were $71.98. Two weeks ago, they were $109.98. BULLSHIT. For basic, unfinished cabinets. A $38 increase in say 6 months? So I was already PISSED that I spent $76 more on two cabinets just to start the project.
I bought them, begrudgingly, and spent my super cool Friday night painting the face of them so that I could try to install them the next day.
Which leads me to my second frustration. When measuring the wall, the width of the back wall was 59 3/4". Each cabinet was 30" so total of 60". This is 1/4" wider than the wall for all of you non-math prodigies. The face of the cabinets have a lip on each side of 1/4" past the side wall. So I knew that I could trim that 1/4" off one side of one cabinet and I'd be at the wall width of 59 3/4". Seems pretty simple, right?
Well, apparently not.
I measured 30" down from the ceiling and put a ledger board so that when I lifted the cabinet up against the wall, it could sit on that and I wouldn't have to hold the entire weight of the cabinet while screwing it into the wall. I also found the studs and marked them with painters tape and had started painting the light blue walls the same white as the upstairs living room walls. Notice the spots on the wall, more on that later.
Then I lifted the first cabinet up and onto the board and attached it to the wall. Super easy.
This photo was taken well after the next part happened, hence all of the laundry stuff in it, but notice nothing to the right of this cabinet? This is where Kristi turned into Dr. Jekyll. And possibly the Hulk.
So back to the math. I figured it was very optimistic that trimming 1/4" off would have that second cabinet sliding in perfectly. I'm a DIYer, I'm not stupid. Nothing goes as planned. But I crossed my fingers, lifted that second cabinet up and tried to squeeeeeeeeeze it into place. HAH. Not happening. Which, again, in the back of my mind I knew was going to happen. So I took it back down, brought it back into the garage and trimmed the other side lip off. Now it should definitely fit, right? Since it's now 1/4" smaller than the width of the wall.
BWAHAHAHAHAHAHAHAHAHAHAH. I've got jokes.
I lifted the cabinet back up onto the ledger board and tried to squeeze it in again. No go. This is where the neighbors started hearing the swears coming from my house. I take it back down and bring it into the garage. Then go back to the laundry and take down the original shelf. I trim 1/4" off of that one, lift it back up onto the wall, re-screw it in, go grab the second cabinet and lift it up onto the ledger board. Doesn't fit. I now am ONE HALF INCH shorter than the width of the wall. WHY IS THIS MUTHAFUCKA NOT FITTING? I take it back to the garage, take the first cabinet back off of the wall, trim the other 1/4" off of it, re-install it (having to now put new holes into the wall and cabinet since the cabinet moved over a 1/4" and I needed to make sure this cabinet was in the studs). Now I have 3/4" to play with for that second cabinet to fit. It's got to, right? Anyone else see where this is going?
I go back into the garage, get the cabinet, lift it back up onto the wall and put it on the ledger board. The top slides back easily. It sits flush with the other cabinet. The bottom doesn't fit. ARE YOU KIDDING ME??????? I'm beyond pissed.
I like to think of myself as semi-strong. Do you know how difficult it is lifting a cabinet by yourself? Almost over your head? While leaning over a dryer? Climbing a step-ladder? Then imagine doing this like 18 times. My arms and neck and back were killing me. At this point, I've basically ruined both cabinets by cutting 1/2" off of each of them. I'm beyond pissed and frustrated. I take the second cabinet back into the garage, take a hammer to the side of it, pop that off, trim the face, top, bottom, and back 1/2" and then put the side back onto it with my nail gun and glue. I lift it and bring it back into the laundry room, climb back up the step-ladder, lift the cabinet back over the dryer and up onto the ledger board. And it still won't fit. Top does. Bottom does not.
I'm literally done. I took the cabinet back into the garage and chucked it into the garbage bin and went inside to make myself a margarita. It was now past 7pm. I started installing around 1pm. If I had taken my blood pressure at this point it, a medic would have been called.
The above photo with the first cabinet on the wall with the laundry supplies in it is where the room sat for a week. Now I've got to figure out what I'm going to do. The obvious choice is shelves on that side. But I had shelves. I wanted closed storage. I wanted to HIDE all of the mess. But what is my other option? I needed something because this is what sat on my kitchen floor, waiting to be put back into the laundry room. For a week.
Once I resigned myself to the fact that I had to do shelves, I started looking at floating shelves. I had the original 3 wood shelves sitting there in my garage. I could use those. I wouldn't have to spend any more money on this stupid project. Easy peasy, right?
Nope. Those shelves were warped, bent, obviously not flat enough to make into floating shelves. Now what? Shopping! I went looking to purchase floating shelves already made, since I am 1000% over this project at this point. Do you know the odds of finding a floating shelf to fit the exact measurement you need? So not happening. Whomp whomp.
It goes back to me making shelves myself. Again, shopping! This time for cute brackets. Cuz I'm not wasting my time making floating shelves. I knew I had a thick board in my garage I could use for the shelves. Just needed to cut it to size and then I could install.
I got the brackets from Amazon- it was a package of 6. So I had 2 left over. I could do a third shelf but I really wanted the bottom shelf to go the width of the room, across the top of both the washer and dryer. But the remaining piece wasn't long enough. I didn't know if the third shelf being the same length as the other two would look weird. Worst I could do was install it and then not like it right?
Oh also- I got cute new storage baskets and a new dryer sheet holder. Cuz I mean, why not?
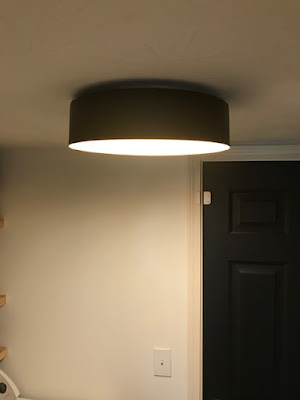
Now I needed a new light. The light fixture in here was no longer working. It left these weird spots all over the wall. I knocked into it every time I lifted my arms. It just wasn't my style any longer. I had been seeing this light fixture whenever I did a quick search and I kept going back to it.
Well, I bought it. And installed it last night. And I love it. And those awful spots along the wall and ceiling are gone!
One last update to the room. This was the door.
That color had to go. I think this is the last remaining bit of that paint color in my house. Remember the powder room and the pedestal table in the kitchen were the same color? Now it looks like this!
Here are few after shots of the room. I still need a small tray/basket/bowl for my keys, which hopefully I'll find today while out and about. It went from this:
To this:
SOOOOOOOOOOOO much better. Now I'm going to try really hard to not have the dryer as the dumping ground any longer. I have to keep this room PRETTY!!


Comments
Post a Comment
Only comment if you are going to tell me how awesome I am. If you don't, I will hunt you down and cut a bitch.