Recovering the Bed... Third Time's the Charm.
So it would seem that the spare bedroom DIY gods are working in my favor this time around. Apparently third time really is the charm. When I posted about the bedroom last week, I really thought the fabric for the bed would be delivered on Monday- like the USPS tracker stated. There were definitely no plans to work on the bed over the weekend.
Until my doorbell rang on Saturday afternoon. Me, with my ninja-like moves, clicked the TV off and quietly tip toed to the door to see who it was. In all honesty, I thought it was one of my Tinder matches coming for me. Fortunately, (or unfortunately- depending on which match it was. I'm talking about you, Bubba!) it was just the mailman. I waited until he pulled away since even though it was in the middle of the day, this mama hadn't even brushed her teeth yet. Never mind showered or brushed her hair. No one needed to see me like that. And we wonder why I'm still single. Anyhoo.....
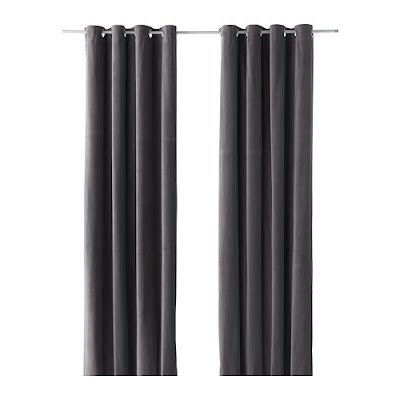
I grabbed the box, tore into it and found my beloved fabric- I mean curtains. Cuz yes, the fabric I bought was really curtains. From Ikea. For $53 and free shipping. There really is a method to my madness when it comes to using anything but fabric for my fabric needs. Remember this same headboard currently has a shower curtain on it. It's so much cheaper. Most upholstery fabric is at least $20 a yard and most times you can't find anything that wouldn't go into your grandma's house. I never have any luck with JoAnn's in-stock fabric. Or Hancock's for that matter. I could have ordered from either the exact fabric I wanted but I would have needed at least 3 yards at roughly $39 a yard, maybe less if I had a coupon- which they normally don't let you use on custom orders. I remembered from a previous trip the gray velvety curtains in a 98" length and thank god for my personal shopper, Miss Wendy, finding some on Ebay. In the store they were $49.99 plus $14 for shipping. One seller had them for $53 with free shipping. No brainer on my end- since it would have cost me more than $4 driving to Cincinnati to the closest Ikea and spending half of the day there. Score one for Kristi. I just had to wait for them to arrive. The Sanela curtain is what I got- see how pretty they are.


I started stapling at the bottom since that was a straight edge, then moved to the top, making sure to pull it tightly. Once I had both the top and bottom done, I moved onto the sides, again pulling tightly so there was no loose fabric.
Oh and the above photo made me think of something! You may already know this but here's a cool trick I've done in a few of the rooms in my house. In the below photo you'll notice the cable wire circling around the room. Super annoying. Next time I build a house, I'm going to know exactly where the bed vs the TV location will be. That way I can put the cable outlet on the wall where it should be. Same with the outlet for the night stand lamps. Next time.

Both the cable and lamp outlets are on the wall on the left in the above photo. Know where the TV is? On the wall opposite of the new feature wall. So basically the cord wraps around the entire room. The extension cord for the lamp just goes behind the bed on this feature wall so not too bad.
Well here is the trick. It might only work for rooms with carpet- not sure. But basically, you can slide the cable under the baseboard and it's hidden by the carpet. See Exhibit A.


You just need to push it underneath. It kind of hurts your fingers, depending on how much/little room there is but it makes it worth it when the room looks like this instead.


I dragged the mattress back in and made the bed back up. Definitely will need to do something with the white duvet. Way too plain. But you can see what I was talking about when deciding on the dark wall color. There will be a lot of white in the room so it's not at all that dark. I also picked up the same gray pillow shams which I haven't washed yet. So those will go on and then I have a lumbar pillow in there as well which I'll need to redo at some point. I'm thinking some combo of black, white and/or green. We'll see what I can find.

Now- on to the nightstands! Which one may already have three coats on it. Want a teaser photo? This is after just one coat of the green. I'm still kind of undecided. I love the color but not too sure it's the color I was going for. We'll see. It does look better after three coats though. I'm going to bring it up into the room and live with it for a few days and see where I'm at after that.

Until my doorbell rang on Saturday afternoon. Me, with my ninja-like moves, clicked the TV off and quietly tip toed to the door to see who it was. In all honesty, I thought it was one of my Tinder matches coming for me. Fortunately, (or unfortunately- depending on which match it was. I'm talking about you, Bubba!) it was just the mailman. I waited until he pulled away since even though it was in the middle of the day, this mama hadn't even brushed her teeth yet. Never mind showered or brushed her hair. No one needed to see me like that. And we wonder why I'm still single. Anyhoo.....
I grabbed the box, tore into it and found my beloved fabric- I mean curtains. Cuz yes, the fabric I bought was really curtains. From Ikea. For $53 and free shipping. There really is a method to my madness when it comes to using anything but fabric for my fabric needs. Remember this same headboard currently has a shower curtain on it. It's so much cheaper. Most upholstery fabric is at least $20 a yard and most times you can't find anything that wouldn't go into your grandma's house. I never have any luck with JoAnn's in-stock fabric. Or Hancock's for that matter. I could have ordered from either the exact fabric I wanted but I would have needed at least 3 yards at roughly $39 a yard, maybe less if I had a coupon- which they normally don't let you use on custom orders. I remembered from a previous trip the gray velvety curtains in a 98" length and thank god for my personal shopper, Miss Wendy, finding some on Ebay. In the store they were $49.99 plus $14 for shipping. One seller had them for $53 with free shipping. No brainer on my end- since it would have cost me more than $4 driving to Cincinnati to the closest Ikea and spending half of the day there. Score one for Kristi. I just had to wait for them to arrive. The Sanela curtain is what I got- see how pretty they are.

I spent a bit ironing them since they were folded and crammed into a box and then headed upstairs to start working on the bed. Since I basically built this bed from scratch, I knew it would take me some time to take it apart. The headboard was easy but the side rails and foot rail, not so much.
As you'll recall, this is what the bed looked like.

I started with the headboard. I didn't spend the time taking off the existing fabric but you could totally do that if you had a covered headboard already. This fabric was smooth and really thin so I knew it wouldn't show through with the new fabric. Plus the velvety fabric is pretty thick. If you had a headboard with thick or textured fabric, I would suggest removing it first.


Oh and the above photo made me think of something! You may already know this but here's a cool trick I've done in a few of the rooms in my house. In the below photo you'll notice the cable wire circling around the room. Super annoying. Next time I build a house, I'm going to know exactly where the bed vs the TV location will be. That way I can put the cable outlet on the wall where it should be. Same with the outlet for the night stand lamps. Next time.

Both the cable and lamp outlets are on the wall on the left in the above photo. Know where the TV is? On the wall opposite of the new feature wall. So basically the cord wraps around the entire room. The extension cord for the lamp just goes behind the bed on this feature wall so not too bad.
Well here is the trick. It might only work for rooms with carpet- not sure. But basically, you can slide the cable under the baseboard and it's hidden by the carpet. See Exhibit A.


You just need to push it underneath. It kind of hurts your fingers, depending on how much/little room there is but it makes it worth it when the room looks like this instead.

As you can see, I also did this with the extension cord, leaving out just a little bit at the end with the plug. Pure genius, I tell you. And you're welcome. Go get to hiding your cords. Well, at least finish the rest of this post first. You owe me that courtesy.
Back to the bed. After getting the headboard covered and cutting off the extra fabric, here is the gorgeousness.


Seriously. Gorgeous, right? I may have petted it. I definitely petted it.
Now came time to undo the bed and recover the rails. I knew it would be a puzzle piece and in the end I'd end up with screws left over that went who knows where. Which happened. But whatever. Just don't jump up and down on the bed and you'll be fine. Hopefully.

Now seriously. You can't even tell they were curtains. About a week ago, I had picked up a fitted sheet in gray from Wally World for about $14. A cheap way to cover the box spring since most of it is shown with a platform style bed. The color is almost a perfect match.


Now- on to the nightstands! Which one may already have three coats on it. Want a teaser photo? This is after just one coat of the green. I'm still kind of undecided. I love the color but not too sure it's the color I was going for. We'll see. It does look better after three coats though. I'm going to bring it up into the room and live with it for a few days and see where I'm at after that.


Comments
Post a Comment
Only comment if you are going to tell me how awesome I am. If you don't, I will hunt you down and cut a bitch.