No Gray Area Here.
So remember back in January when I talked about updating the spare bedroom? Well, mama got started on it last week! I can’t even begin to describe how good it looks. I’m in love with the wall color. I’m in love with the furniture color. Although I might not like it so much once it’s actually on the furniture but we’ll see when that happens. The lady who mixed my paint gave me the raised eyebrows look when I told her what it was going on. Clearly, she has no vision. If you didn’t catch my photo on Facebook, here are the colors I went with.
So last weekend, I started removing the furniture from the room. Little did I know the furniture was so heavy. I literally dragged and then slid one of the night stands down the stairs and out into the garage. The other night stand and the dresser are in the room still waiting for a manly man with lots of muscles to come help me bring them down. Damsel in distress, party of one! There was no way I’d be able to do it myself. Everything else is out of the room and taking up space in the loft. What a mess.
I spent the rest of the day doing touch up work where the wall meets the ceiling and around the door frames. That way no old paint color would be visible and I’d have a nice crisp line of separation.
Once that was dry, I started painting the gray on the walls. I’ve never really had a dark color on any of my bedroom walls so it’s quite shocking at first, especially when wet. But I think once the pops of white get added back in, it won’t really look so dark. Either way, I really love the color.
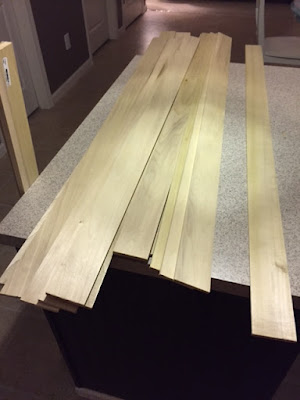
After the walls were painted, I headed to Lowe’s to pick up the board for the wall treatment. I used ¼ in. 3 X 4’s. They are poplar and are classified for crafting. I also used these in my kitchen drawers for the dividers for the silverware. I purchased all 25 that they had, hoping but not knowing at that point if it would be enough.
When I got home, I painted the boards 8 at a time and then went upstairs to measure the wall to figure out the pattern and how many squares I wanted. Luckily my wall length wise was 139 inches, which was evenly divisible by 7 squares at 17” once the boards were placed (the boards were actually 2.5 inches).
The room has an 8ft ceiling, so minus the height of the baseboards, I just had to trim a few inches off of the second row of boards.
Getting those two rows on was really easy once I got going. All I really needed were the boards, a level, tape measure, and nail gun. Also- can I just say how badass I feel when I use my nail gun? It’s seriously awesome. I may have danced around the room, pretending to be one of Charlie’s Angel’s with the nail gun. I will neither confirm nor deny that.
Unfortunately, I did run out of boards. The sucky thing about the 4ft boards, was that I only needed 34 inches. So I had a 14” waste on each board. If only they sold them in 3ft pieces, I would have been set. I wasn’t really in to piecing the left over 14” to make 17” either, although I would have if I couldn’t find more of the boards. This was how it looked on Sunday night.
So Monday after work I headed back to Lowe’s, only to see an empty slot where the wood should be, which means that they hadn’t received another shipment since I bought them out. My buddy Joe looked up the nearest stores to see if they had some and one about 7 miles down the road had 20 so I headed there. And don’t act like you aren’t on a first name basis with the employees at your local Lowe’s.
After picking up another 16 boards, I headed back home, painted 12 of them and started installing again. Now, if I wasn’t so antsy, I would have calculated how many boards I actually needed before rushing to purchase and then PAINT them, but of course I didn’t do that. I only needed 9 more boards so I wasted 3 since I already put paint on them. Oh well. I still can return 4. You live, you learn.
After the remaining boards were installs, it was about 11:45pm so I decided to call it a night. But yesterday after work I started on filling all of the nail holes and places where the boarded butted up to another board. I started to caulk around the insides of the squares but 1) that was a mess and 2) I lack the patience to do all that.
Once the wood filler was dry, I quickly sanded those spots down and wiped it clean. I debated on heading to bed, since it was already around 11pm but I knew I wouldn’t be able to sleep without putting another coat of paint on the boards. Here is how it looked first thing this morning. Good morning beautiful!
Boy, am I happy that I didn’t wait!! It looks so good! I’m seriously in love with it. I mean, screw Tinder, I’m marrying this wall.
Now on to the bed. I ordered the fabric earlier this week so it should be here next Monday. Shouldn't take me too long to recover the bed and then I can start on the furniture!


Comments
Post a Comment
Only comment if you are going to tell me how awesome I am. If you don't, I will hunt you down and cut a bitch.