Kitchen Remodel Part 2- New Back Splash
Guys I finished grouting the back splash last month. It by no means is anywhere near done. But I just haven't had the time, nor the energy for house projects. It's been a rough couple of months in Kristiland. Rough. I'm not happy that this kitchen remodel isn't done yet. Not happy at all. But in all honesty, my health has been my priority lately and I can't get stressed over a backsplash or cabinets.
To complete this backsplash I need to put the trim around it. The trim is already cut and ready to be installed, courtesy of my Daddy-O. But I'm undecided on if I want to paint the trim the same as the wall color so it blends in. Or do I want to stain it and have a bit of contrast. I'm leaning toward staining it. But I'm going to test the stain out on scrap pieces and put it next to the backsplash to see how it looks. Either way, I'm not installing the trim til the end because I still need to paint the walls....and finish the cabinets.... and ugh.
Why trim the backsplash? I'm one who likes to trim out my back splash to give it a cleaner look. More professionals probably know how to do tile so that you don't need to trim it out. Oh well. This is only my second attempt. And I like trim. So whatevs. My previous backsplash had trim on it- in a different capacity- which if you zoom into the picture below you might be able to see. This new trim will actually encase the backsplash this go around, rather than it being an outside border.
Flashing back to the old kitchen. The back splash that I had was a temporary one until I figured out what I wanted to do with my countertops- ie to stone, or not to stone. But ten years later that cheap tile was still up there. It's served it's purpose. It was time to go.
Refresher.


Here's an upclose shot from the store when I bought it.


Here is the tile cleaned up a bit.

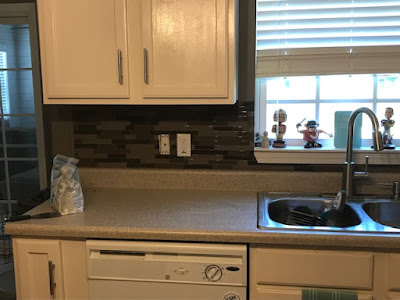
The below two photos show the completely dried grout. Much lighter than I wanted. But again. whatevs. It's done. It's pretty. I still love the tile.


To complete this backsplash I need to put the trim around it. The trim is already cut and ready to be installed, courtesy of my Daddy-O. But I'm undecided on if I want to paint the trim the same as the wall color so it blends in. Or do I want to stain it and have a bit of contrast. I'm leaning toward staining it. But I'm going to test the stain out on scrap pieces and put it next to the backsplash to see how it looks. Either way, I'm not installing the trim til the end because I still need to paint the walls....and finish the cabinets.... and ugh.
Why trim the backsplash? I'm one who likes to trim out my back splash to give it a cleaner look. More professionals probably know how to do tile so that you don't need to trim it out. Oh well. This is only my second attempt. And I like trim. So whatevs. My previous backsplash had trim on it- in a different capacity- which if you zoom into the picture below you might be able to see. This new trim will actually encase the backsplash this go around, rather than it being an outside border.
Flashing back to the old kitchen. The back splash that I had was a temporary one until I figured out what I wanted to do with my countertops- ie to stone, or not to stone. But ten years later that cheap tile was still up there. It's served it's purpose. It was time to go.
Refresher.


Here's an upclose shot from the store when I bought it.

Like I said- I got them cheap. The wall color is the lighter color on the tile. It was like a perfect match.
So when I decided that we'd be re-doing the kitchen, I found this beauty.

I had actually grabbed about 5 different sample sheets of tile and brought them home to see which ones went with the counters best. This one won out. Plus it was the one on sale for half price- which honestly wasn't in the decision making process whatsoever. But it sure as shit made my estimated cost go down! Score!
Before we could do anything with the new tile- we needed to get rid of the old. And let me tell you, it was pure satisfaction removing it. Although my skinned knuckles might disagree.


Once everything was cleaned up a bit, even with the leftover mortar still on the walls, the kitchen had brightened up quite a bit. Now I knew it'd get a little darker with the gray tile but man...... with the brown's gone, it already looked a thousand times better. And yes, we drink wine while we work. Well my aunt and I drink wine, my dad goes for the beer. Don't judge. It was "vacation."
We got as much of the old mortar off without damaging the drywall as we could and then headed to rent the saw to cut the tiles. Then it was off to the races with the new tile.


If you know anything about tiling- which I clearly do not- you'd know that we started it wrong. But we didn't realize that until we had the above section done. We started by just putting a sheet up- hence the missing pieces in bottom row. Our intent was that we'd cut tiles in half to fit in those spots. Yeah.... that didn't work out very well. But we didn't find that out until 2 days later. The amount of time we spent cutting the individual tiles in half to fit the entire bottom row was excruciating.
So the next day, I made a suggestion to my dad. How about we flip the sheet so the tile we needed on the bottom could be cut in half across and then it'd be a straight line across and we could then put the entire sheet on the wall. See below.

It was already going so much smoother. At the end of the day we had this.

No small pieces to cut. But we still had to figure out the other side. Because what we didn't realize is that even though they are in sheets, they still move around a bit. So some of the half tiles that we had cut weren't fitting. We had also already returned the unused sheets of tile. And returned the rental saw.
I had no idea what to do. So it sat like that for a few days. I finally said to my dad that I wanted it ripped off. We were trying to pop off pieces and move them slightly to fit pieces in and I could just picture it looking terrible. The sink side, the one where I stand most of the time when I'm in the kitchen was going to look the worst and that's all I'd be able to see. My dad was like- you want to rip it all off? WHAT? I'm sure in his head he was saying- "Are you @#(* @(*&$%^*(@!@ )(#*%$@# $!@ kidding me?!?!?!?!" You know that red face emoji with the black swear box covering it's mouth? Yeah- that was my dad in this moment. Head about to explode on me.
But he obliged. :)
Before we did that though, I ran to the store to see if they still had the tile I had just returned. LUCKILY- they did. I bought all of it again. Then came time to take the freshly tiled tiles back off.

This time around we weren't so lucky with not damaging the walls. We had to do quite a bit of repair work. And when I say "we" I absolutely mean my dad. I unfortunately had to go to work for a couple of days and he mudded and spackled and sanded and fixed the wall. Good daddy.
Once it was dry though- mama got those pretty tiles back on the wall- the right way. Man, hindsight, am I right? Under a $100 mistake, but it sure did put a damper on that project. At the end of the day I am extremely happy we took it off and redid it.

So much better. Now it was time for the grout. I actually had to special order the grout since they didn't carry the color I wanted in store. I actually HATE seeing grout. It makes everything far too busy. I like my grout to match the tile color. This color is called Rain and the the closest to the color of the tile. NOT like the white the sales guy was trying to get me to purchase. Or the grays they had in stock that were darker than the tile color. Nope- I wanted EXACT same color. Apparently I'm the only customer he's had that hates seeing grout. Now I will admit- when it was wet- PERFECT match. When it dried, not so much. I'm slightly disappointed. But not enough to rip it all off and start again. I know I'm insane thinking I was going to get perfect match. I just hoped for a bit closer in color- like the sample matched the tile. But oh well. It's not as drastic as pure white would have been. And I absolutely hated the white. You win some. You lose some.
You might have seen my teaser photo way back on August 3rd.

You can see how very similar in color the wet grout is to the tile. Booooo.
Grout is a messy process, guys. Messy. So much fun.


Here is the tile cleaned up a bit.

The below two photos show the completely dried grout. Much lighter than I wanted. But again. whatevs. It's done. It's pretty. I still love the tile.


Now if I could just get the lower cabinet doors and drawers sanded and painted.... I'd be all set. Although it's been very convenient just reaching in and grabbing things without having to open doors this last month and a half. But it's seriously driving me nuts seeing everything that's piled away in those cabinets. And some four legged cutie pie thinks she can stick her nose in every.damn.thing. since there isn't anything stopping her now. Damn Janie Jane. So for her sake, the cabinets NEED to get finished. At least the bottoms. The tops? That's an entirely different story.


Comments
Post a Comment
Only comment if you are going to tell me how awesome I am. If you don't, I will hunt you down and cut a bitch.