Finally Finished the Master Closet
Guys, this stay at home crap is at least getting me to check a few things off of the projects list. So I guess there's one good thing about it. Literally only one. I'm so fucking over this.
Anyway. Back in April of 2018 (yes, I know. I'm ridiculous) I started some upgrades on my master closet.
I wanted to get rid of this side shelving unit thingy. The bottom was supposed to be a pullout hamper drawer that just never worked. It was made from plywood that my clothes constantly stuck to. It was very rookie DIY. #ashamed
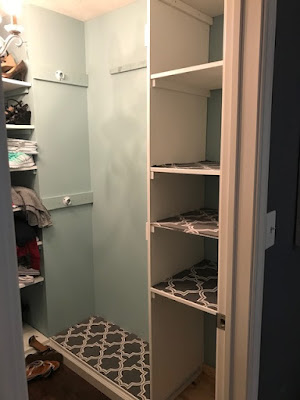
I had purchased 4 pre-fab closet organizer units and put them together one day after work. I ripped this side unit out and added 2 of the pre-fab units in.

The other two went on the other side- not replacing anything, just put there. You'll see in a minute.
This is how it's been for 2 years. I mean, I actually had my clothes hung on it and all. But for the most part- like this.
My issue with this was that the bases were still there. Now they jutted out and were very obvious. And they are a dirt and dust collector. The problem was that when I put the bases in, I didn't run the floor all of the way underneath them. Same on the other side where my pants are.

I had completely forgotten that I had extra flooring underneath one of the spare room beds. Thank god Miss Janie Jane got stuck under the bed! I thought I had used the rest when I did the other master closet. Nope. I was wrong! And for once it was a good thing!

Score! A full box and a few full pieces and a lot of random pieces in the opened box. I definitely had enough to finish this.
Yesterday I started by ripping out the pants side- which is the left side of the closet.


And added floor!

Then I went to the right side and did the same thing. Only this was a LOT more work.


OK see above where it juts out on the right side? Well they were actually connected. Which was fine because either way I was removing the entire thing. But this meant I'd have to take both pre-fab units off to remove it. Which also meant that they would now be lower by about 4 inches. Which meant the hanging bar that was attached to the bottom unit (the bottom bar of clothes) would now be lower by 4in, where the other side holding that bar would remain the same height. Oof. But no worries. I got her done. Easy peasy.
Oh and while I was at it- I filled all of the holes left from removing that giant plywood shelving unit from 2 years ago.


I also decided while doing this, I was going to remove the bases at the back part of the closet as well as the bottom of the shoe area. Luckily both of these had flooring under them so it saved me a little bit of time.


Now came time to build it back up.

I didn't get a photo of the top unit back in place, but you can probably picture that. Or just look at the next set of photos, where I've started to add the baseboards back into place. Thankfully I had enough pieces of leftover boards, none of which were the correct sizes. But for the most part the only area where I needed to put pieces together to make a long strip was the very back of the closet. I'm not too concerned. I also need to caulk and fill the gap on the below photo. Clearly this wall was not 90 degrees.


It's not like a big WOW factor, but it definitely makes me happier walking in and not seeing those large white bases jutting out under everything. Check that one off the list.
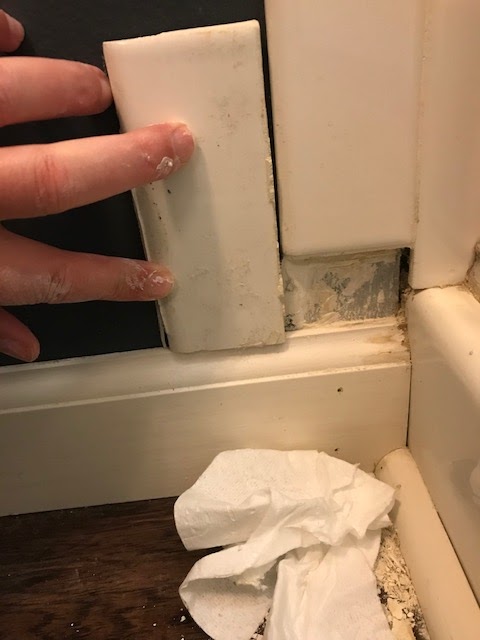
Another quick thing I did was in my master bathroom. Whoever the idiot was that built this house and was doing the tiling in my bathroom did something that drove me crazy for about 8 years. So when I put the same flooring down in the bathroom, I fixed it.
Basically in the nook where the shower is, on the left side they had the tile going all the way to the floor and then had the base board butting up to that. But on the other side, literally 3 feet away, they had the baseboard butting up to the shower pan and the tile on top of the baseboard. It's like, come on guys, you HAD to know that isn't right. Then add in a buyer with serious OCD and think she isn't going to notice it? Jesus, people drive me nuts with their half-assed bullshit.
OK back to my fixing this two years ago. Well, by extending the baseboard to the shower pan, I now only had room for about 1 inch of tile, rather than the 3 inch piece that was removed. I had intended to just go to Lowe's or wherever and buy a 1" x 1" piece and call it a day. Fast forward two years......
Again.... #ashamed.
I totally remembered last July while my dad and Aunt were out here and we had rented the tile saw for the back splash to cut the piece. I even brought it up- "Hey, before we return the saw, we've got to cut that one piece of bathroom tile." Annnnnnnnnnnd we forgot. Insert face palm emoji.
So last weekend I was in the garage cleaning off my metal shelves and reorganizing things..... I went to hang something on my pegboard of hand tools and BOOM BITCHES!!!!!! I have a freaking tile cutter hanging there too. Like come on. How did I not remember I had that? I don't even know WHY I have that.
I ran upstairs and grabbed the tile and then measured to what size I needed. I also scraped the old mortar off too. Messy.


I cut the tile and cleaned it up, grabbed the bag of mortar, a plastic shot glass, and a spoon and headed back upstairs.


And viola! It's like it was never missing.

Checked two things off the list this weekend. Now, does anyone want to come stain my fence? Cuz that's still on the list. And it's gonna be a bitch.
Anyway. Back in April of 2018 (yes, I know. I'm ridiculous) I started some upgrades on my master closet.

I wanted to get rid of this side shelving unit thingy. The bottom was supposed to be a pullout hamper drawer that just never worked. It was made from plywood that my clothes constantly stuck to. It was very rookie DIY. #ashamed
I had purchased 4 pre-fab closet organizer units and put them together one day after work. I ripped this side unit out and added 2 of the pre-fab units in.

The other two went on the other side- not replacing anything, just put there. You'll see in a minute.
This is how it's been for 2 years. I mean, I actually had my clothes hung on it and all. But for the most part- like this.
My issue with this was that the bases were still there. Now they jutted out and were very obvious. And they are a dirt and dust collector. The problem was that when I put the bases in, I didn't run the floor all of the way underneath them. Same on the other side where my pants are.

I had completely forgotten that I had extra flooring underneath one of the spare room beds. Thank god Miss Janie Jane got stuck under the bed! I thought I had used the rest when I did the other master closet. Nope. I was wrong! And for once it was a good thing!

Score! A full box and a few full pieces and a lot of random pieces in the opened box. I definitely had enough to finish this.
Yesterday I started by ripping out the pants side- which is the left side of the closet.


And added floor!

Then I went to the right side and did the same thing. Only this was a LOT more work.


OK see above where it juts out on the right side? Well they were actually connected. Which was fine because either way I was removing the entire thing. But this meant I'd have to take both pre-fab units off to remove it. Which also meant that they would now be lower by about 4 inches. Which meant the hanging bar that was attached to the bottom unit (the bottom bar of clothes) would now be lower by 4in, where the other side holding that bar would remain the same height. Oof. But no worries. I got her done. Easy peasy.


I also decided while doing this, I was going to remove the bases at the back part of the closet as well as the bottom of the shoe area. Luckily both of these had flooring under them so it saved me a little bit of time.


Now came time to build it back up.

I didn't get a photo of the top unit back in place, but you can probably picture that. Or just look at the next set of photos, where I've started to add the baseboards back into place. Thankfully I had enough pieces of leftover boards, none of which were the correct sizes. But for the most part the only area where I needed to put pieces together to make a long strip was the very back of the closet. I'm not too concerned. I also need to caulk and fill the gap on the below photo. Clearly this wall was not 90 degrees.


Another quick thing I did was in my master bathroom. Whoever the idiot was that built this house and was doing the tiling in my bathroom did something that drove me crazy for about 8 years. So when I put the same flooring down in the bathroom, I fixed it.
Basically in the nook where the shower is, on the left side they had the tile going all the way to the floor and then had the base board butting up to that. But on the other side, literally 3 feet away, they had the baseboard butting up to the shower pan and the tile on top of the baseboard. It's like, come on guys, you HAD to know that isn't right. Then add in a buyer with serious OCD and think she isn't going to notice it? Jesus, people drive me nuts with their half-assed bullshit.
OK back to my fixing this two years ago. Well, by extending the baseboard to the shower pan, I now only had room for about 1 inch of tile, rather than the 3 inch piece that was removed. I had intended to just go to Lowe's or wherever and buy a 1" x 1" piece and call it a day. Fast forward two years......
Again.... #ashamed.
I totally remembered last July while my dad and Aunt were out here and we had rented the tile saw for the back splash to cut the piece. I even brought it up- "Hey, before we return the saw, we've got to cut that one piece of bathroom tile." Annnnnnnnnnnd we forgot. Insert face palm emoji.
So last weekend I was in the garage cleaning off my metal shelves and reorganizing things..... I went to hang something on my pegboard of hand tools and BOOM BITCHES!!!!!! I have a freaking tile cutter hanging there too. Like come on. How did I not remember I had that? I don't even know WHY I have that.
I ran upstairs and grabbed the tile and then measured to what size I needed. I also scraped the old mortar off too. Messy.

I cut the tile and cleaned it up, grabbed the bag of mortar, a plastic shot glass, and a spoon and headed back upstairs.

{cheers}

And viola! It's like it was never missing.

Checked two things off the list this weekend. Now, does anyone want to come stain my fence? Cuz that's still on the list. And it's gonna be a bitch.


Comments
Post a Comment
Only comment if you are going to tell me how awesome I am. If you don't, I will hunt you down and cut a bitch.