Baby Got Back(splash)!
Before I left for MA for the holidays, I happened upon some glass tile on a random shopping trip at the home improvement store. What? You all don't have random shopping trips to home improvement stores? I call bullshit. Anyhoo- I ran home and measured how much square footage my kitchen back splash was then headed back over to pick up 20 sheets. It was on-sale for $4.44 a square foot which is SUPER cheap since they are typically more in the $9-12 range. This is what it looks like.
The lightest color of the three is almost the exact same color of my kitchen wall paint. I was going to hold off on installing a back splash until I decided if I was going to change my counters- which would have been years down the road because my counters- although laminate- aren't actually that bad looking. So I didn't want to spend money on a back splash if I was going to have to remove it or have it get damaged by replacing the counters. But for under $100 I decided to change my mind. Cuz I'm a girl. And I'm allowed to do that.
Well I spent all day one Sunday- well up until the Patriots game started- working on tiling. I decided to create an edge because I couldn't figure out how to make the end not look awkward. The wall goes past the counter about 4 inches and the edge of the cabinets doesn't line up with the edge of the counter. So I decided to put a piece of trim at the end of the counter and paint it the same color of the wall to make sort of a border. See what I'm talking about?
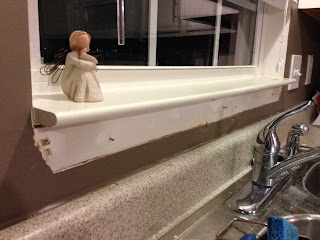
Then I pulled off the molding under the window. There was no other reason for that other than I was being lazy. The height from the top of the counter to the bottom of the molding was 1 and 1/2 tiles high. I didn't want to look at a raggedy cut half tile every time I do dishes. So I left them whole and tiled where the molding would go and then I just plan to put the molding back over the tile using some sort of adhesive. Clearly this is not yet done.
Once the molding was off it was time to start installing the tile.
It actually didn't take too long. The longest amount of time was spent on cutting around the outlets. All 6 of them. Seriously- who needs 6 outlets on the counter? Ridiculous.
I finished the two walls in about 4 hours- minus a few small cuts- about 10 pieces- before the Patriots came on. My plan was to finish the rest of them on Monday after work. Well......
After the game on Sunday I went upstairs and literally spend the entire night with my head in the toilet. Not sure if I caught a bug or ate something bad. But. It. Was. Awful. I actually called in sick to work on Monday because I couldn't go 15 minutes without running back to the bathroom. Sorry- TMI.
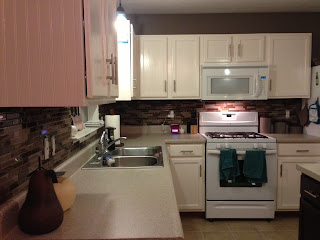
That week I was still kind of sick and not feeling up to doing anything- never mind finishing up the tile work. So it sat there. And then I had a cheerleading event all the next weekend so it sat there some more. Finally last night I was able to finish the remaining cuts and got them on the wall. Here it is now!!
I haven't grouted it yet or put the molding back on under the window. But for the most part- it's done!! I actually am excited to grout it since the white mortar is showing through and it's obnoxious. The grout is a mocha color so it won't be obvious at all and will really go great with the colors of the tile.
So what do you think? It's a big difference from what it was. Every time I come around the corner into the kitchen, it surprises me all shiny and shit. It really makes a big difference in the room. I fucking love it. I almost went an entire post without one swear. I have no idea what is wrong with me.
But I'm really happy toalmost have one project crossed off the list for 2013. Now I just need to start thinking about what I'm going to do next!! I mean, AFTER I grout. One project at a time Kristi.
PS- the best thing about this project? I went back to the store and saw that the tile was marked down to $3.33 a square foot- so I ended up saving another $20+ in the tile!!
The lightest color of the three is almost the exact same color of my kitchen wall paint. I was going to hold off on installing a back splash until I decided if I was going to change my counters- which would have been years down the road because my counters- although laminate- aren't actually that bad looking. So I didn't want to spend money on a back splash if I was going to have to remove it or have it get damaged by replacing the counters. But for under $100 I decided to change my mind. Cuz I'm a girl. And I'm allowed to do that.
Well I spent all day one Sunday- well up until the Patriots game started- working on tiling. I decided to create an edge because I couldn't figure out how to make the end not look awkward. The wall goes past the counter about 4 inches and the edge of the cabinets doesn't line up with the edge of the counter. So I decided to put a piece of trim at the end of the counter and paint it the same color of the wall to make sort of a border. See what I'm talking about?
Then I pulled off the molding under the window. There was no other reason for that other than I was being lazy. The height from the top of the counter to the bottom of the molding was 1 and 1/2 tiles high. I didn't want to look at a raggedy cut half tile every time I do dishes. So I left them whole and tiled where the molding would go and then I just plan to put the molding back over the tile using some sort of adhesive. Clearly this is not yet done.
Once the molding was off it was time to start installing the tile.
It actually didn't take too long. The longest amount of time was spent on cutting around the outlets. All 6 of them. Seriously- who needs 6 outlets on the counter? Ridiculous.
I finished the two walls in about 4 hours- minus a few small cuts- about 10 pieces- before the Patriots came on. My plan was to finish the rest of them on Monday after work. Well......
After the game on Sunday I went upstairs and literally spend the entire night with my head in the toilet. Not sure if I caught a bug or ate something bad. But. It. Was. Awful. I actually called in sick to work on Monday because I couldn't go 15 minutes without running back to the bathroom. Sorry- TMI.
That week I was still kind of sick and not feeling up to doing anything- never mind finishing up the tile work. So it sat there. And then I had a cheerleading event all the next weekend so it sat there some more. Finally last night I was able to finish the remaining cuts and got them on the wall. Here it is now!!
I haven't grouted it yet or put the molding back on under the window. But for the most part- it's done!! I actually am excited to grout it since the white mortar is showing through and it's obnoxious. The grout is a mocha color so it won't be obvious at all and will really go great with the colors of the tile.
So what do you think? It's a big difference from what it was. Every time I come around the corner into the kitchen, it surprises me all shiny and shit. It really makes a big difference in the room. I fucking love it. I almost went an entire post without one swear. I have no idea what is wrong with me.
But I'm really happy to
PS- the best thing about this project? I went back to the store and saw that the tile was marked down to $3.33 a square foot- so I ended up saving another $20+ in the tile!!


Comments
Post a Comment
Only comment if you are going to tell me how awesome I am. If you don't, I will hunt you down and cut a bitch.