Loved Them So Much, I Made Myself One.
I mean, the title of the post gives it away right? I wanted my own wood art piece for my own house!
I had been scouring Pinterest the last few months and kept coming across pieces that were like what I made. Some were really cool. So while I was working "REALLY HARD" from home, I decided to start drawing my idea of what I'd like to create. ( Did you totally picture me doing air quotes there? Cuz I absolutely was.)

Very professional with my yellow notepad. I started coloring various angles and lengths of pieces of wood to see how it'd fit together. Final drawing.....

See? Laptop. Kristi HARD AT WORK. I actually think I was drawing this while on a video conference. So technically I was multi-tasking.
Anyway- obviously unlike most of my other drawings for projects- this is definitely not to scale. I had no idea with the wood that I planned on using and the size I planned to make this- if all of this would fit inside the framed area. But it gave me a starting point and whatever fit would have to do.
This was the first time I was going to try making the frame with 45 degree angles to make the corners. Normally I just butt them up to each other as a 90 degree angle. Having not done it before, I decided that I'd start by taping two pieces of wood together so that when I cut the angles, I'd be making the same cuts for both, ensuring the same length pieces with the same angle. See- I'm not just a pretty face people.

The below shot is after the top and bottom pieces were cut. I repeated for the same taping idea with the two side pieces as well. Perfect fit. Or as that kids like to say in a really weird voice..... Like a glove.


Now that I had the frame pieces and attached them together I could start on the actually guts of the piece.

I ended at this the first day. Probably about 2 hours of work accomplished that.

The next afternoon I got back into the garage to try and finish making it.

Yes I know. I need a better working table/flat surface. Using two pieces of wood on flimsy plastic saw horses as a table, all while using a nail gun? Probably not the smartest idea. But that's how I roll. I have a work bench that my dad made me- but this piece is actually bigger than the size of the table. It's roughly 4 1/2 ft by 2 1/2 ft. So while it might have been a little bit more sturdy than what I was using, it'd still be hanging off in areas. And it'd mean I'd have to take off everything that's on top of the bench and ain't nobody got time for that.
Actually it's not laziness for not using it. My miter saw is on the table and I'd rather a sturdy saw and not lose an arm than a less than sturdy work place for the piece and only have the possibility of shooting myself with the nail gun. I mean, how bad would that be? They are brad nails for crying out loud. They couldn't do that much damage. I'd be rather proud to show off those battle scars.


And finish it I did. Or so I thought. This was the how it came out at the end of my second afternoon.

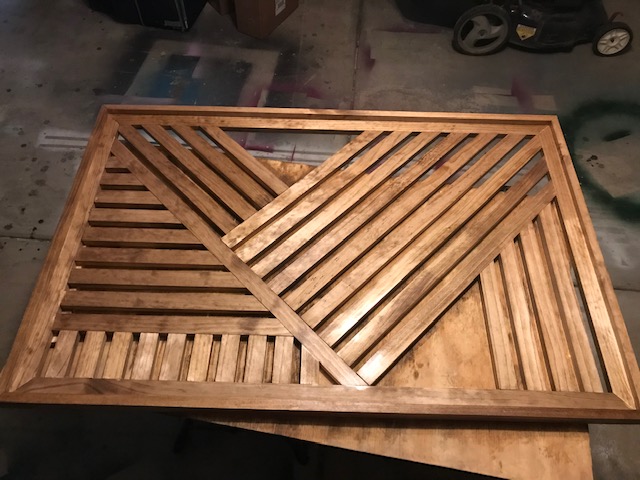
I used all of the same sized board- 1 X 2 X 8's. I laid them so the 2" was flat so that's what's facing the piece. It's 1" thick if you may. I liked it but wasn't in love with it yet. I decided to add another frame around it- standing the wood up so that it's 2" thick and you see the face of the 1". It gives it a little more dimension and depth- exactly what it needed. See the top of the photo below.


I hadn't planned on leaving the open spaces of the triangles. But once I had the top one I kind of liked the look of it. So to have a little balance, I did one on the bottom as well.
Now came the time to stain it. I decided against my normal dark walnut and went with special walnut.


I slept on it because at first I didn't like it at all. I absolutely HATE orange tinted/stained wood. Awful. This was totally giving me that vibe. I also wanted it darker to go with the stair railing and spindles.
Well, after waking up and looking at it again. I knew I'd hate it. So back in the garage it went.
I put two coats of dark walnut on it. It definitely toned down the orange. But it's not as dark as I'd like it to be. Honestly, I don't think adding more coats would event help it. I think it's the wood (select pine for those wondering). I'm gonna suck it up and stick with it.

The coloring on the above isn't true to what it is. I blame my florescent lights right above the piece. But you can at least tell the less orange and more brown vibe thought.
Here she is hung up and on display.


And a sassy little side view.

It took an area in my house that has been a blank space for more than 10 years and gave it a little bit of pop.
I love it. It's definitely not perfect. I learned quite a few things along the way of building it that I'd do differently. But I think for my first attempt- it's fucking amazing!
I had been scouring Pinterest the last few months and kept coming across pieces that were like what I made. Some were really cool. So while I was working "REALLY HARD" from home, I decided to start drawing my idea of what I'd like to create. ( Did you totally picture me doing air quotes there? Cuz I absolutely was.)

Very professional with my yellow notepad. I started coloring various angles and lengths of pieces of wood to see how it'd fit together. Final drawing.....

See? Laptop. Kristi HARD AT WORK. I actually think I was drawing this while on a video conference. So technically I was multi-tasking.
Anyway- obviously unlike most of my other drawings for projects- this is definitely not to scale. I had no idea with the wood that I planned on using and the size I planned to make this- if all of this would fit inside the framed area. But it gave me a starting point and whatever fit would have to do.
This was the first time I was going to try making the frame with 45 degree angles to make the corners. Normally I just butt them up to each other as a 90 degree angle. Having not done it before, I decided that I'd start by taping two pieces of wood together so that when I cut the angles, I'd be making the same cuts for both, ensuring the same length pieces with the same angle. See- I'm not just a pretty face people.

The below shot is after the top and bottom pieces were cut. I repeated for the same taping idea with the two side pieces as well. Perfect fit. Or as that kids like to say in a really weird voice..... Like a glove.


Now that I had the frame pieces and attached them together I could start on the actually guts of the piece.

I ended at this the first day. Probably about 2 hours of work accomplished that.

The next afternoon I got back into the garage to try and finish making it.

Yes I know. I need a better working table/flat surface. Using two pieces of wood on flimsy plastic saw horses as a table, all while using a nail gun? Probably not the smartest idea. But that's how I roll. I have a work bench that my dad made me- but this piece is actually bigger than the size of the table. It's roughly 4 1/2 ft by 2 1/2 ft. So while it might have been a little bit more sturdy than what I was using, it'd still be hanging off in areas. And it'd mean I'd have to take off everything that's on top of the bench and ain't nobody got time for that.
Actually it's not laziness for not using it. My miter saw is on the table and I'd rather a sturdy saw and not lose an arm than a less than sturdy work place for the piece and only have the possibility of shooting myself with the nail gun. I mean, how bad would that be? They are brad nails for crying out loud. They couldn't do that much damage. I'd be rather proud to show off those battle scars.


And finish it I did. Or so I thought. This was the how it came out at the end of my second afternoon.

I used all of the same sized board- 1 X 2 X 8's. I laid them so the 2" was flat so that's what's facing the piece. It's 1" thick if you may. I liked it but wasn't in love with it yet. I decided to add another frame around it- standing the wood up so that it's 2" thick and you see the face of the 1". It gives it a little more dimension and depth- exactly what it needed. See the top of the photo below.

And completely framed.

I hadn't planned on leaving the open spaces of the triangles. But once I had the top one I kind of liked the look of it. So to have a little balance, I did one on the bottom as well.
Now came the time to stain it. I decided against my normal dark walnut and went with special walnut.

I slept on it because at first I didn't like it at all. I absolutely HATE orange tinted/stained wood. Awful. This was totally giving me that vibe. I also wanted it darker to go with the stair railing and spindles.
Well, after waking up and looking at it again. I knew I'd hate it. So back in the garage it went.
I put two coats of dark walnut on it. It definitely toned down the orange. But it's not as dark as I'd like it to be. Honestly, I don't think adding more coats would event help it. I think it's the wood (select pine for those wondering). I'm gonna suck it up and stick with it.

The coloring on the above isn't true to what it is. I blame my florescent lights right above the piece. But you can at least tell the less orange and more brown vibe thought.
Here she is hung up and on display.


And a sassy little side view.

It took an area in my house that has been a blank space for more than 10 years and gave it a little bit of pop.
I love it. It's definitely not perfect. I learned quite a few things along the way of building it that I'd do differently. But I think for my first attempt- it's fucking amazing!


Comments
Post a Comment
Only comment if you are going to tell me how awesome I am. If you don't, I will hunt you down and cut a bitch.